Last month I reviewed one of UTG's bipods. You can see that review by going to this link, Leapers UTG Tactical OP-1 Bipod Review Model TL-BP78. In that review, I compared the UTG OP-1 to another manufactures bipod since I had one that was nearly identical in height. I also showed the bipod installed on my FNAR rifle. After that review, I performed a review of the UTG Foldabpe Foregrip since I own three of these grips. During the grip review, I installed the OP-1 bipod on my Ruger 10/22 and really like the way the bipod and grip nested on the quad rail. Since my son also has a Ruger 10/22, the same quad rail, and the same foldable foregrip, it just seemed like the fatherly thing to do was to set him up with a bipod on his rifle. Instead of putting the exact same bipod on his rifle, I ended up going with UTG's slightly taller bipod. I chose a taller bipod because it provided for a new product to review. Therefore, this is a review of the Leapers UTG Tactical OP-2 Bipod. Since the OP-1 and OP-2 are basically the same bipods except for height, you need to take a look at the OP-1 Review and see how it compared to another manufactures bipod.
You can find the Leapers UTG Tactical OP-2 Bipod at CheaperThanDirt.com for $21.97 plus S&H. The photo below is the bipod in the box.
The next photo is of what comes inside the box. The bipod itself comes fully assembled. The adapter that converts the sling swivel stud to a rail mount is also fully assembled, but I have shown it disassembled below.
The next photos show the outside of the box in more detail and the basic marketing data on the bipod.
The next couple of photos show the OP-1 and OP-2 bipods together. The first photo is with them fully collapsed and the second photo shows them fully extended. The only real difference I can see between these two bipods is with the leg tube lengths and the spring sizes. Everything else seems to be the same, which I would have expected.
OP-1 OP-2
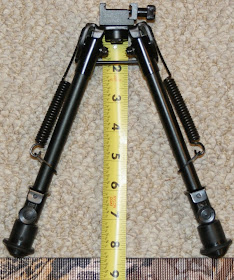
I checked the OP-2 bipod to verify it's fully collapsed and extended heights. My simplistic methods checked out to be as advertised, 8.3" to 12.7".
The bipod assembly weighed in at 13.35 ounces.
The adapter assemble weighed in at 2.27 ounces
Just so you can see the parts a little better, I included another photo of the adapter assembly. There is the rail plate, swivel stud attachment, cross pin and thumb nut.
The only issue I found with the bipod was that the cross pin threads seemed to be poorly machined with a slight taper as shown below. Is this a deal breaker? No, because the cross pin actually gets captured by the slots in the rail plate and the thumb nut.
The adapter installs on a rifle with the following pictorial steps. Slide the swivel stud attachment over the swivel stud.
Install the cross pin
Slide the rail plate over the swivel stud attachment.
Tighten the thumb nut firmly to prevent the rail plate from moving. Also, there is a rubber pad between the rail plate and your stock. The edge of the rubber is visible below.
Last, attach the bipod like any other normal rail mounted accessory.
Bottom Line:
I'm pleased with the overall value you get with Leapers UTG Tactical OP-2 Bipod. I'm not sure how long CheaperThanDirt.com can continue their low pricing, but at about $22 plus S&H, I think this bipod is a deal. Even at the higher Internet prices (low $30s) it is still cheaper than some others on the market. The threads were not perfect on the cross pin, but had no impact on the performance of this bipod. I also checked my OP-1 and the threads were OK on that cross pin.
Just for kicks, I am showing the photo of my Ruger 10/22 (folding stock) as well as my son's. We have been tricking them out and enjoying it.
Update 12/24/10:
I added the photo below to show the bipod in the closed position.


I see you put this on your Ruger SR556, nice! I just put one on mine and it works good enough for government work.
ReplyDeleteMichael
Just used your diagrams to install the bipod on my 30-06...Thanks, it helped a lot.
ReplyDeleteGreat read thaanks
ReplyDelete