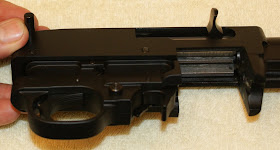
In Part 1 of my Ruger Charger Review, I covered what comes in the box when you purchase the pistol and the external features of the Ruger 22 Charger Pistol. In this part of the review, I'm going to cover disassembly of the Ruger Charger Pistol. Keep in mind this pistol is a couple of years old and has shot thousands of rounds at this point. Overall it is in great condition, but there are some wear areas.
Before you start working on any firearm, you should always remove the magazine, open the bolt and look in the chamber to make sure the gun is empty. After doing that, I started the disassembly by removing the bipod. Next I loosened the take-down screw so the barrel and receiver assembly could be removed from the stock. You don't need to remove the screw, just loosen it enough so that it is not threaded in the lower receiver. The trick to removing the barrel-receiver is to move the safety to the middle of it's travel as you remove the barrel-receiver from the stock. As you rotate the barrel-receiver assembly upward away from the stock, make sure the two receiver cross pins and bolt stop pin do not fall out.
You can remove the bolt stop pin by using a punch or Alan wrench (or usually the tip of your finger nail) to press it out. Once you get it started, you can usually pull in out with your fingers.
Next you need to remove the receiver pins that connect the trigger assembly to the receiver. A light tap with a punch on the pins should push them out.
Next to remove the bolt, position the receiver upside down so the bolt is fully accessible. In my case, I have already removed the bolt stop pin. If you have not, you need to do it now.
Pull the bolt handle fully to the rear as shown. While in this position, lift up on the front edge of the bolt and it will disengage from the bolt handle. You can then lift the bolt out of the gun.
Finally, release the pressure on the bolt handle and then take the bolt handle out through the ejection port.
One thing you will notice in these photos is that the matte paint finish on my receiver is wearing off on the inside of the receiver. This is no big deal cosmetically because it is on the inside, but I recommend removing the bolt often when cleaning to get rid of any paint that has worn free.
The photo below shows all the main pieces of the pistol after disassembly. I do not recommend any further disassembly because I have found that I can thoroughly clean my pistol and rifles at this level.
The barrel and receiver are made from steel.
The receiver comes with a Weaver style scope base adapter.
The barrel is attached to the receiver by a barrel retaining V-block. It is not threaded into the receiver. I have removed the barrel on my older Ruger 10/22, but didn't want to on this pistol because I don't have any Loctite for reassembly.
You can also see where the finish has worn off due to magazine installation.

I'm not sure if it is age and use, but the spring on this Charger seems stiffer than that of my rifles. Also the fit of the cocking handle on the guide rod seemed tighter than my rifles. Early on I had some issues with cheaper ammo jamming on a fairly regular basis. Since I have cleaned, and keep lubrication on these parts, I have not had any issue since.
I'm a little surprised with the roughness of the bolt body. I know that roughness is related to friction, but as long as the pistol can shoot reliably, this is not a problem.
The trigger housing appears to be some type of polymer material. So far it seems to be holding up well. While I had this assembly out, I measured the trigger pull at 4.67 pounds.
I'm pleased with the stocks finish, color (this model is black), and fit. It also has a good feel in your hand.
Re-assembly of the pistol is in the reverse order for disassembly. Make sure you put some lubricant on all moving parts.
Bottom Line (Part 2):
The Ruger 22 Charger is easy to disassembe for cleaning. I have noticed that on the inside of the receiver that the paint/finish is wearing off. This is not a big deal other than you may want to strip it down and clean it on a regular basis. Also the cocking handle and guide rod seemed to have a tight fit compared to my rifles and the recoil spring also seemed more stiff. I think the combination of all these accounted for jamming of the pistol early on with cheaper ammo. Now that fits have loosend, jamming is not an issue and it is a blast to shoot.
You can see Part 1: In the Box & Exterior Features by going to this link. In Part 3 I will cover the range test results.
© 2010 Gunsumer Reports


KEVIN, THANK YOU FOR ALL THE INFO ON THE CHARGER. I BOUGHT ONE AND TOOK IT TO THE RANGE FOR A DAY OF SHOOTING(APPROX 225 ROUNDS). AFTER READING YOUR BLOG TODAY, I WAS ABLE TO DISASSEMBLE, CLEAN, AND REASSEMBLE WITH NO PROBLEMS. THANKS AGAIN!
ReplyDeleteThanks, I'm glad it helped. The Charger continues to prove that it is a real tack driver.
ReplyDelete