This review will actually have two main components. The first will be the mechanical and functional aspects of the flashlight. The second will be the illumination and battery life aspects of the flashlight. I'm really looking forward to this review because over the years I have purchased a couple of Inova rechargeables (and rail mounts) and also a Streamlight TLR-1, plus some other no-name-brand LEDs. I'm not saying I'm an expert in LED flashlights, but I have formed an opinion of what I like. When I discovered that UTG has a 200 Lumens weapons mounted flashlight, I was excited to get one and checkout it out. I ended up getting a Leapers UTG Swatforce LED Tactical Flashlight Model LT-EL338.
My first positive impression of the product was based on the packaging. I would have to give UTG an A+ on the packaging. I know that the quality of the package has nothing to do with the quality of the product, but it does give you a first impression on the product.


After you open the box, the flashlight and accessories are neatly packaged in a custom foam tray as shown below.

Inside the box is the flashlight, replaceable rail mount housing, three CR123A batteries, pressure switch and owner's manual.

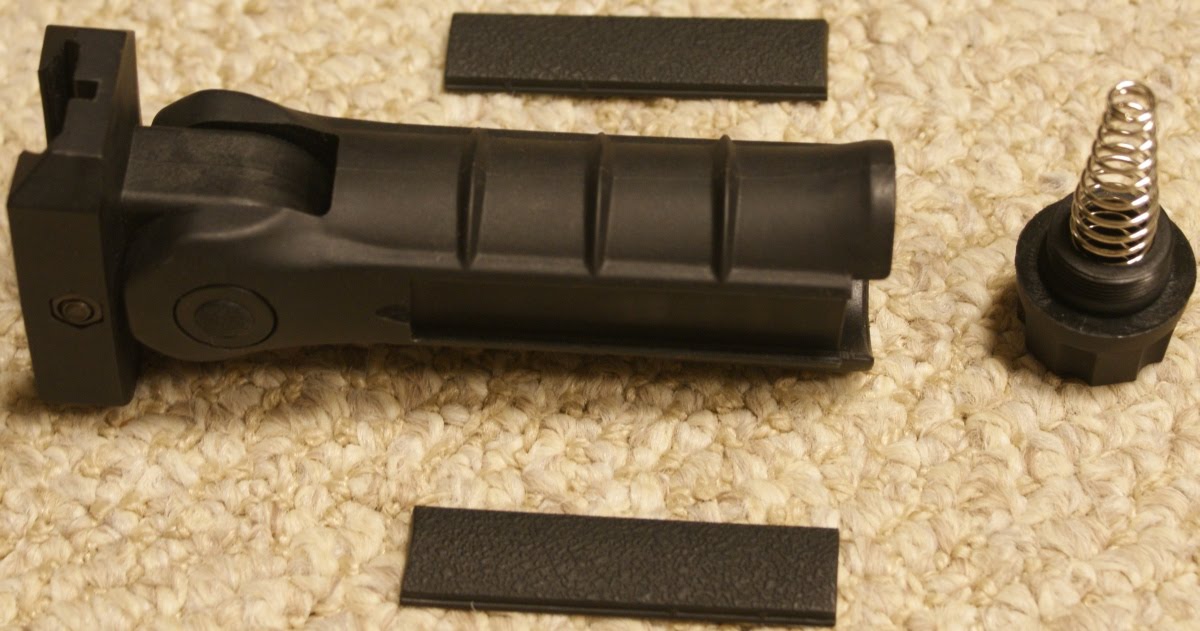
The basic flashlight is made up of the following pieces. After further study, I missed removing a rubber seal that is in the cap on the right in this photo.

The reflector and led unit is UTG's replaceable 37mm Integrated Reflector Bulb (IRB). I prefer the texture of this type of reflector compared to the smooth reflectors. They seem to give a more even spread of light within the beam area.

The portion that holds the reflector is made of aluminum. Notice the o-rings at both end of the threaded areas. With the lens holder and body of the flashlight attached, I would expect these to be very protected against moisture and dust. I'm a little surprised that they do not make any claim about being water proof or resistant. I'm sure they didn't for a reason, so I'm not going to do a water test.

The main body can be switched for either a hand held or integrated rail mounted body. You choose one or the other. For my purposes, I plan to keep it in the rail mounted main body configuration most of the time. That way it is ready to mount on a rifle and is still usable as a handheld flashlight. Basically I'm just paying a weight penalty for using it as a handheld.

One thing you need to understand is that this flashlight is solid. As you can see in the photo below, the wall thickness is over 0.1" think. This is great for ruggedness, but bad for weight.

The flashlight weighs in at the following weights (batteries installed) for the three basic configurations.
Hand Held Body and Push Button Switch was 9.47 ounces. The Leapers website listed a weight of 9.8 ounces. I would think they are referring to this configuration because the rail mount body is well over the 9.8 ounces.

Rail Mount Body and Push Button Switch, 12.24 ounces

Rail Mount Body and Pressure Switch, 12.83 ounces

The pressure switch and button switch make contact at the battery (copper plunger or spring) and the outside bare aluminum rings (silver looking area). I think the reason they don't make any claims about water proof/resistance is that when you press the button switch, you break the seal protective seal in the end cap.
Pressure Switch Button Switch

I decided to include the operation instructions from the owners manual. Basically when the button switch is installed, you can screw the end cap on tightly and it will turn the light on continuously. With the end cap slightly lose, you can press the button switch to provide instant on and off capability. If you remove the button switch and install the pressure switch, it operates by pushing on the pressure switch pad. When I first started using the flashlight, it was not clear how tight the end cap would need to be for these to work properly. With the pressure switch, you need to make sure the end cap is very tight so that it makes contact with the body. The o-rings may make you think it is tight enough, but I found I had to really get it tight. If you play around with it I think you will see what I'm talking about. This was the same when you need to screw in the end cap for the button switch when trying to turn it on for the constant mode.

The next two photos show the flashlight in the rail mounted body configuration and then the rail mounted body along with the pressure switch installed.


One thing I really liked about this flashlight is that it becomes a relatively low profile light when mounted on a rail. You can see in the photo below that there is very little room between the lens portion of the flashlight and the rail when mounted. Up until now, I have been using my Inova lights with a separate light mount that causes the light to be further offset from the rail.

This concludes my first component of the review which was the mechanical and functional part. So far this flashlight seems to be very rugged and protected from the elements. I'm not a big fan of having to screw the end cap to turn the light to a continuous on state and would have preferred that feature to somehow be integrated into the push button part. On the other hand, keeping the push button as a single mode of operations keeps things simple and sometimes simple is better. I like the way the flashlight mounts to the rail with the thumb nuts and it being low profile. So far, I'm believing it is worthy of the $60 price tag.
In this next section of the review, I plan to look at the illumination and battery life aspects of the flashlight. For the illumination review, I'm going to compare the UTG flashlight against the Inova T4 and the Streamlight TLR-1. Since they are not all the same lumens, what I'm looking for is to compare beam characteristics and overall releative brightness against each other. Inova and Streamlight make some excelent products and this should give you an idea on how the UTG stacks up. The flashlights being compared are shown in the next photos and lumens rating of each is shown below.
Streamlight TLR-1 - 135 Lumens
Inova T4 - 175 Lumens
UTG Swatforce - 200 Lumens

The next three photos were taken with my camera set to manual mode, ISO 1600, F3.5, 1/160s at 64" from a block wall painted white. The actual brightness on the wall seen with your eyes is much brighter than that shown in the photos, but I needed to reduce the amount of light getting to the camera so that the photos didn't over saturate with white in the full area similarly to the center spot.
Streamlight TLR-1

Inova T4

UTG Swatforce

Since the center spots in the photos above was so saturated with light, I decided to reduce the light further so that we may be able to compare the intensity of the center spots against each other. I changed the effective film speed from ISO1600 to ISO100 and took these next three photos.
Streamlight TLR-1

Inova T4

UTG Swatforce

From the two groups of photos above, I think the first group shows that the UTG has a brighter larger flood area of light. The second group shows that it has a brighter more focused center spot area. I have been extremely pleased with both my Streamlight and Inova because of the their illumination characteristics (flood and spot). The UTG being a 200 lumen flashlight does appear brighter than the 175 lumen Inova and is clearly brighter than the 135 Lumen Streamlight. The photo below shows how the UTG looks when you shine it on the wall (camera was in automatic mode). At 64" from the wall, the beam diameter was 77".

For the battery life test, I replaced the batteries with a fresh set Rayovac batteries. I placed the camera 64" from the wall and set the exposure to manual mode. I used the same setting used in the first group above, ISO 1600, F3.5, 1/160s. Remember this camera setting is with the exposure reduced to keep the photo from washing out. The actual wall looked much brighter. I started out taking photos every 15 minutes for the first hour then every 5 minutes thereafter. The photos below show the data.
Light turned on - 0 minutes

90 minutes

120 minutes

150 minutes

180 minutes

190 minutes

200 minutes

210 minutes

220 minutes

230 minutes

240 minutes - the actual light at this point was about as much as you would get from a key chain LED.

UTG states this flashlight is good for 90 minutes. I'm not sure what battery they used to rate the flashlight, but the Rayovacs I used made it double that (190 minutes) before showing any noticeable reduction in intensity. In my mind, UTG could have rated the flashlight longer than 90 minutes.
Bottom Line:
The UTG Swatforce 200 Lumens Flashlight delivers as advertised. I prefer a push button switch that will turn the flashlight to a continuous on beam, but I'm getting used to the screw in cap. This flashlight has a good beam quality (my preference) and is brighter than a comparable 175 lumen flashlight (which it should be). The battery run time seemed great at over double the advertised time. Would I recommend this flashlight? Yes. I'm actually going to put my Inova to the side and start carrying this light on my rifle for those night hunts due to the increased lumens.
Update 10/22/13:
The light held up well on a 12 gauge shotgun when shooting 00 buckshot. Unfortunately, over this past year, the LED has shown a significant decrease in brightness. My guess is that the total output of the LED with new batteries is less than 75 lumens.