Tuesday, March 30, 2010

Command Arms Accessories (CAA) One (Single) Point Sling Review

Single Point Sling Review, CAA Review
If you have been following my reviews, you will know that I reviewed a Shooters Ridge Single Point Sling Adapter last week.  Now that I have a single point sling adapter on my rifle, I had to have a single point sling.  I ended up getting the Command Arms Accessories (CCA) One (Single) Point Sling from Opticsplanet.com for $32.09.  There are several single point slings on the market to choose from by manufacturers such as Blackhawk, Uncle Mike's, 5.11, Spec Ops, etc.  The two main things I was looking for were bungee cord and price.

There is nothing fancy about the packaging of this product.  In this case, less is better to keep the price down because the risk of damaging a sling has to be extremely low.


There is very little useful information on the bag related to the actual sling itself.  I know that a sling is not rocket science, but something telling you front or back would have been nice.


The sling comes fully assembled.  The only thing you can do to take it apart is to take the steel carabiner style connector off of the bungee cord.  Everything else is stitched such that it can not come off.  The main web is 1.5" nylon webbing and is looped through a connecting link on one end and a quick release buckle on the other end.


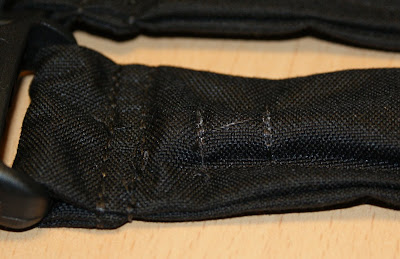
The other side of the connecting link and buckle are each stitched to a tube of material.  This tube of material has the 5/16" bungee cord stitched inside the tube as close to the connecting link and buckle as practical.  If I were to identify any part as the weakest link, this bungee to tube attachment would probably be it.  You can see in the photo below that there is a double stitch line over the round bungee cord end.  Only time will tell me how this will hold up.


The tube of material on each side is stitched together at the other end so that both sides will slide up and down together.  I'm not real sure why the tubes are so long other than it gives the look of the sling with a more robust look in that area.  Strength wise, they provide no support.  There is another elastic tube that covers the carabiner style steel connector.  This elastic tube slides over the connector and will help to prevent scratches on your rifle along with blocking access to the spring loaded latch on the connector.


You can see the carabiner style connector below.


It is hard to see, but the way the adjustment buckle is positioned on the webbing (hard curved part up) and the way that the quick release buckle is turned on the webbing (webbing looping in and out from one side), it makes me think it was intended to wear the sling with the quick release buckle under your arm pit and not on your chest.  The sling seems to form naturally to a certain position.  If I flip the buckle, you can wear it with the buckle on your chest.  Perhaps if you wear it long enough in this other position it will eventually form to that position.


Yes, this is me below.  Now male model.  Good thing I have another job...  Anyway, I purchased this sling to go along with my FNAR rifle, but I can also use it on any other rifle with a single point sling attachment.  I think it is pushing it to say my 20" barrel FNAR is a tactical rifle needing a single point sling.  Regardless, I wanted a single point sling.  The wide 1.5" webbing helps reduce the pressure of the weight of the rifle on my shoulder and the rifle hangs in a good position.


When I am walking around the lake looking for beavers or moving from one coyote spot to another, holding the rifle by the grip to prevent it from swinging while walking seems comfortable and I don't have to lift the weight of the rifle.


When I bring the rifle up to a shooting position, the sling does not hinder my movement or prevent me from achieving a natural standing shooting position.


If you click on the photo below, you can see that the sling bends up as you lift the rifle.


Bottom Line: 
The Command Arms Accessories One Point Sling does every thing a single point sling should do.  It has bungee cord, a quick release buckle, is adjustable in length and is at a reasonable price.  Would I buy another?  Probably not because I have not had my hands on enough of these slings to form a solid opinion of the other manufacturers products.  Would I recommend it?  Yes, but cautiously.  Before you buy, try to put your hands on the other manufacturers slings and consider some of the points I have covered in this review.

Monday, March 29, 2010

Uncle Buds Bulls Bag Review

For years, I have wanted to get some type of real shooting sand bags.  Up until now, I have used anything I could find to prop my rifle when zeroing or checking zero.  A buddy of mine at work spoke highly about a bag and I decided to check it out.  I purchased the Uncle Bud's Bulls Bag Bench Tree Camo/Tuff-Tec 15" Shooting Rest (Unfilled) from Amazon.com for $41.02 including shipping and handling.  This next photo is what you get in the box.


Honestly, the outside of the box is a wealth of marketing information.  Also if you go to their website, you will see that they go the extra mile to market their products.  The next couple of photos are the different sides of the box.


This sheet below was the instruction sheet inside the box.


Notice that there is Velcro on the fill nipples that keeps them closed and then you tuck the nipples into the pockets and the pocket flaps also Velcro to the nipples.


I decided to reduce the weight of the bag and fill mine with bird seed instead of sand.  The instructions said it could weigh as much as 40 lbs with sand.  Mine ended up weighing about 18.5 lbs.  Another buddy of mine reminded me that I better make sure the location I store the bag is rodent free.  Good point.  I don't want holes chewed in the bag while something trys to get to the seeds.


You can see all the fill ports are closed below and the nipples are tucked in the pockets.


The material where your rifle rests does a great job of gripping the forearm.  You can see in the photo below that much of my rifle is to the left of the bag and the Bulls Bag grips solid and has enough weight to hold the gun in this position.


I took the bag to an indoor range and did a basic zero on my rifle at 25 yards.  One thing I quickly learned is that if you are going to shoot a rifle with a pistol grip, this is probably not the right bag for you unless you plan to put the bag on another object.  The pistol grip was too close to the table for me to aim correctly.  I ended up putting a gun case under the bag and it helped out greatly.

While shooting, I could tell that the bag made a huge difference in recoil due to the extra mass gripping the gun.  Also, it let me hold very accurately while shooting.

Bottom Line: 
The Uncle Bud's Bulls Bag Bench 15" is a good product that will increase the accuracy of your shooting and does reduce recoil.  If you are wanting to shoot something with a pistol grip, consider the X7 or PRO-Series Bulls Bag instead.  Knowing what I know now, I would have purchased the X7 or PRO-Series for my intended use.

Sunday, March 28, 2010

FNAR Review - Second Range Test (25 Yards Indoors)

On Saturday, the winds were 13 mph with gusts up to 25ish mph.  On Sunday, there was rain. So I decided to head down to an indoors rifle range and at least shoot 25 yards to verify the scope zero.  Also, shooting at this distance should allow me to go directly to the 100 yard range next weekend.

My first three shots were those to the left of the bulls eye.  After I adjusted the scope, my next four shots were those on the orange.  I really did not like my shooting rest setup because all I had was my Bulls Bag and the table was too short for me to get comfortable.  The pistiol grip had to hang off the back of the table and you can see I was having too much scatter in elevation.  I put my gun case on the top of the table and then the Bulls Bag and was happier with this setup.  My next three shots were the lower group on the target.  After that I shot two 5 round groups (top and right groups).  Since I feel better with my shooting position for the last three groups, I'm only going to talk about them.  Below is the data based on the 25 yard and extrapolated to 100 yards (center to center group size x 4).
  • 3 shots 0.21" at 25 yards would be 0.82" at 100 yards with cheap plinking ammo
  • 5 shots 0.39" at 25 yards would be 1.56" at 100 yards with cheap plinking ammo
  • 5 shots 0.49" at 25 yards would be 1.96" at 100 yards with cheap plinking ammo
FNAR 25 yds, PMC 147gr FMJ-BT

FNAR 25 yds, PMC 147gr FMJ-BT

FNAR 25 yds, PMC 147gr FMJ-BT, 0.52" edge to edge which gives 0.21" center to center

FNAR 25 yds, PMC 147gr FMJ-BT, 0.70 edge to edge which gives 0.39" center to center

FNAR 25 yds, PMC 147gr FMJ-BT, 0.80" edge to edge which gives 0.49" center to center

Final Thoughs: 
If cheap ammo will do this, I think match ammo will do great.  I didn't want to waste any match ammo on this 25 yard test.  When I shoot at 100 yards, I will also have a much better rest setup.  I plan on using a Caldwell Lead Sled.  I'm looking for the accuracy of the rifle, not the accuracy of me (that's a different review).

You can see all of my posts on my FNAR rifle by going to my Summary Page.

Blackhawk Single Point Sling Adapter Review

Blackhawk Single Point Sling Adapter Review, Blackhawk Review, Sling Adapter Review
Although the FNAR comes with forearm and butt stock sling mounts, I really wanted to use a single point sling on this rifle.  Also, I have an AR-15 with an A2 stock and wanted to use a single point sling on that rifle also.  For my AR, I could go out and purchase an adapter plate that installs between the stock and receiver.  They are a little pricey, but it is probably the best technical solution.  But for my FNAR, there is no adapter plate (at least not at this time).  While I was searching for a solution, I stumbled across the Blackhawk Single Point Sling Adapter.  I ended up getting one from Opticsplanet.com for $5.59.


Notice the buckle on the right.  It keeps the webbing from slipping once installed on your rifle.  Also, it is a royal pain to get the webbing back through this buckle while on your rifle.  Especially if you install the adapter tight to your stock like I did.


Below you can see what the webbing looked like after I installed the adapter.  I had to use a screw driver to start the webbing through the second side of the buckle and a pair of pliers to pull it the rest of the way.


Since the pliers frayed the end of the webbing, I trimmed it back and re-melted the webbing to prevent if from fraying.  Now it looked good as new again.


The next two photos are with my FNAR hanging from the Blackhawk Single Point Sling Adapter.  FYI, that is a CAA One Point Sling supporting my rifle and it will be my next review item.  With the adapter installed tight against my stock, it holds the rifle well and keeps a good shape (doesn’t roll over and look sloppy).


Bottom Line: 
The Blackhawk Single Point Sling Adapter is a real pain to install correctly due to the plastic buckle not having much room to thread the webbing through.  I believe this is because the webbing is tubular, it is like having 4 layers of webbing through the buckle.  The good side is that once you get it in place, this adapter is rock solid.  I have no fear that this attachment would ever fail.  Was it worth $5.59?  Most definitely.  Will I ever buy another?  The next time I place an order from some other gadgets, I will get at least one more of these for my AR-15 and even possibly another to have on hand.

Thursday, March 25, 2010

Shooters Ridge Bipod Picatinny Rail Adapter Review

Bipod Adpater Review, Picatinny Adapter Review, Rail Review, Shooters Ridge Review
If you have been following my blog (reviews), then you will know that I purchased a Harris Bipod and did a review on that product the other day.  You can see this review at this, Harris Bipods Series S Model 25C Review or by clicking "Harris Bipods" under the "Labels" heading on the right.  The reason I'm telling you this is that their bipods are designed to mount to your front sling swivel stud.  This works great on my hunting rifles.  My problem is that I plan on doing some coyote hunting with my AR-15 rifle.  This rifle has a full quad rail, but no sling swivel stud.  Thus I need an adapter.  After doing some researching on the internet, I finally decided to get the Shooters Ridge Bipod Picatinny Rail Adapter.  It looked decent and the price was right.  I got it at Opticsplanet.com for $9.99 and was already ordering some other stuff, so shipping was covered.

The package is below with photos of the front and back of the cardboard insert inside the package.


My initial thought when I took it out of the package was that it seemed long.  It measured 2.0" long.  Later I came to the decision that length was a good thing.  The stud is offset for a reason which you will see later.  General photos of the picatinny rail adapter are below.


In this next photo you will see that the thumb nut is prevented from being screwed off the cross bolt by the nylon locking hex nut embedded in the thumb nut.  This is a great feature because it prevents you from ever screwing the thumb nut off and the letting the pieces get separated.  Also notice that the moveable side bar is captured in the main block by the puzzle like connection.  When you loosen the thumb nut, the side bar will not pop out of place.


Up above I said you would know why the stud is offset.  The two photos below show why.  For the Harris bipod, if you install the short side of the stud forward, then the adapter will be contacting the bipod attachment in the center of the interface area (left photo).  If you flip it around, you can see that the bipod is shifted all the way to one side (right photo).  From a support perspective, the bipod centered on the adapter provides better support to the bipod.  It looks like Shooters Ridge did some planning to make this happen.  I think the instructions they sent on the back of the package insert show a mount similar to the right photo.  Either way, it still supports the rifle well.


You can also mount the adapter directly to the bipod and then use it as a quick attachment to your rail.


You can also install it on your rail and then install the bipod when needed.  When the bipod is not installed, you can use the adapter as a forward sling swivel stud.  In the photo below, I actually have it installed in what I would consider to be a backwards configuration (long side forward).


The next two photos show the picatinny rail adapter and bipod installed on my AR-15.  Again notice the the bipod is shifted all the way to one side of the adapter.  I decided to go ahead and show these photos because it gives you an idea of the less optimum case for installing the adapter.  Keep in mind that it had no trouble supporting the rifle and a quick flip of the adapter would have corrected this.  I don't have any other bipods at the moment, so if yours is different than the Harris, I suggest taking a look and determining the  optimum way to mount the adapter.


Bottom Line: 
If you are going to purchase a bipod that mounts to the sling swivel stud, go ahead and get an adapter if you have any other rifle that has a lower rail and no stud.  It is cheap and gives you the versatility of using your bipod on more rifles.  The Shooters Ridge Bipod Picatinny Rail Adapter is well worth the money.  It seems of good quality and they did put some engineering into this simple device.